HOW I EDIT MY PHOTOS - MUSEUM OF GOOD VIBES
- Talia

- Feb 20, 2019
- 3 min read

Long time no see! I haven't been able to publish many posts in 2019 (college life is rough, lemme tell ya) and I've missed blogging, so I'm excited to share a much-requested post today: how I edit my photos! I personally do all of my own editing unless I'm working with a professional photog, and I'm here to spill all my tips and tricks!
These photos were shot inside the Museum of Good Vibes pop up stop in Lawrence, KS - most of the shots are still pretty grainy due to the bad lighting in the museum, but the photos still turned out super fun with a little help from editing! Keep reading to learn what apps I use, how I edit my photos, and to get my outfit details!

LIGHTROOM
I use the Adobe Lightroom iPhone app to edit all of my photos! It's such an amazing app (although it can be confusing at first) and should be free through the app store; you can purchase presets from other influencers or create your own - I personally use my own. There are so many cool tools to use in Lightroom, but for now I'll show a tutorial from my phone of how I would typically edit a photo and list my top tips below!
I almost always start editing a photo in Lightroom by clicking the "Auto" button - it auto adjusts the photos settings and is a good base to start editing! I then click the "Light" tab and play with lighting, usually turning up the Brightness and Whites, and then head to the "Color" tab. Under "Color", you can adjust the temperature to be warmer or cooler, and I always turn the tint up slightly pinker (because you'll learn that most raw photos have a green tint at the start), and I usually turn up the vibrance. At the top right of the color tab, click the "Mix" button to play around with the colors in your photo - my favorite part! For this particular photo, I de-saturated the red because my skin was looking pretty red and I wanted to even the skin tone, de-saturated the yellow to help even out the colors, and messed with the hue of the blue to create the prettier teal shade that I desired. Pro-tip: de-saturate the blue/purple from your shady photos and your colors will pop better! At any time just hold down on the photo to see a before and after, and then save the photo to your camera roll!
AIRBRUSH
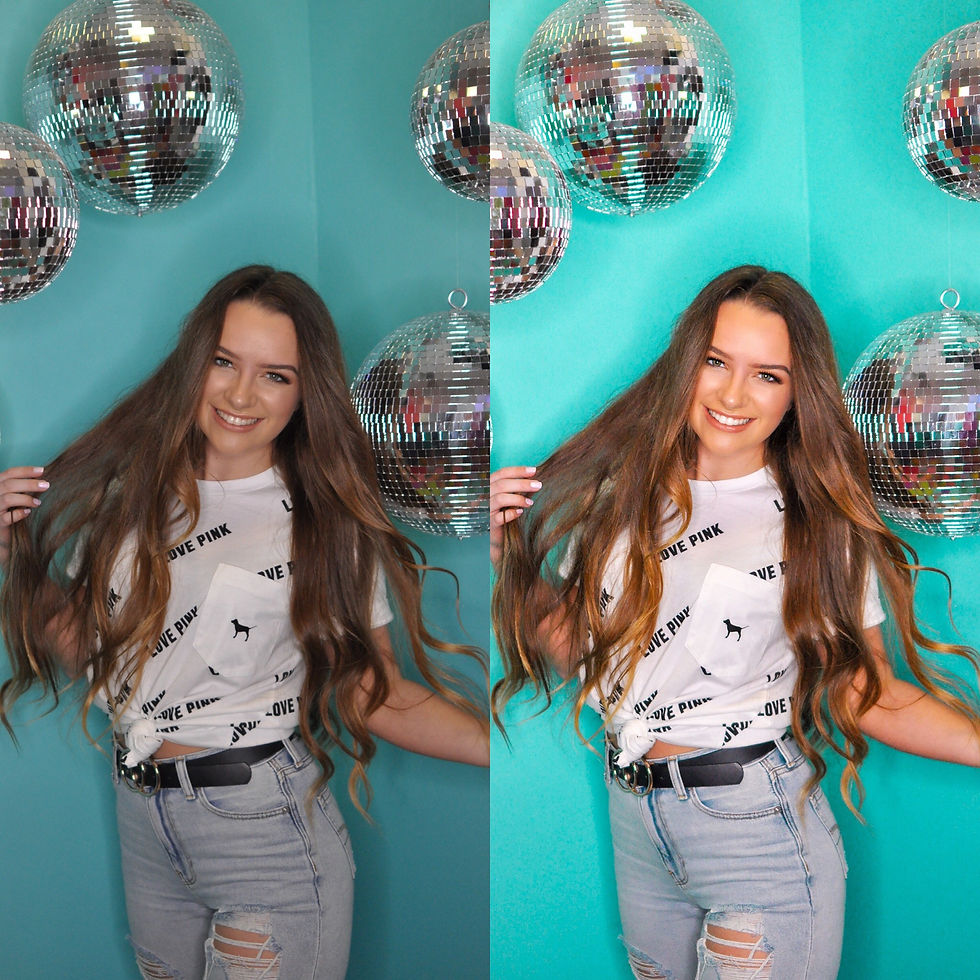
I just recently began using the AirBrush app (also free) for photos of myself; I open the AirBrush app and only tap one button - "Magic" - to tan and even my skin tone, whiten my teeth, and brighten my eyes. Just look at the differences in the photos above; it's a super easy fix that honestly does so much for the photo!

VSCO
I used to religiously use VSCO to edit photos, but now that I'm hooked on Lightroom, I've barely touched it! It's definitely worth mentioning though, especially if you're into filters! The app is free, but you can pay $20/year to unlock a ton of amazing filters and tools.

To edit a photo in VSCO, I would first head to the adjustments tab and click "Tone" to turn up the shadows, and mess with the "White Balance" and "Saturation". Then I would scroll through all of the filters and find my fave! I personally love the V3, L4, and S3 filters for brighter, better photos! Again, press down on the photo to see a before and after!

FACETUNE
FaceTune definitely has a negative connotation, but I've found it to be a super useful hack for brightening photos; I use the teeth-whitening tool to brighten the whites in my pics! In the photo above, I used the tool on the floor, wall, and my white t-shirt too brighten the photo and disguise some shadows after editing it in Lightroom! This free app is also great for fixing blemishes/bruises if you use the blur tool.

UNFOLD
I've listed all of the apps I use for editing photos, but I also utilize the Unfold app to create amazing Insta stories! They have all kinds of layouts and fonts for photos/videos and is honestly so much fun to play around with! I definitely utilize this app for creating cute stories for our PINK accounts. It's also free, but you can pay to unlock other layouts.

Life • Styling: Talia • Location: Museum of Good Vibes
OUTFIT DETAILS
♡ T-SHIRT: VS PINK ♡ JEANS: American Eagle ♡ SNEAKERS: Fila ♡ BELT: ASOS ♡


Comments